G1 Robot Action Programming Operation Guide
Chapter 1: Basic System Operations
1.1 System Startup
Startup Steps
- Open browser and navigate to G1 Robot Control Interface
- Check the status bar at the top of the page:
- Shows "Online": Robot connection normal, ready for operation
- Shows "Offline": Connection lost, needs reconnection
- If showing offline, click the Refresh Status button to reconnect
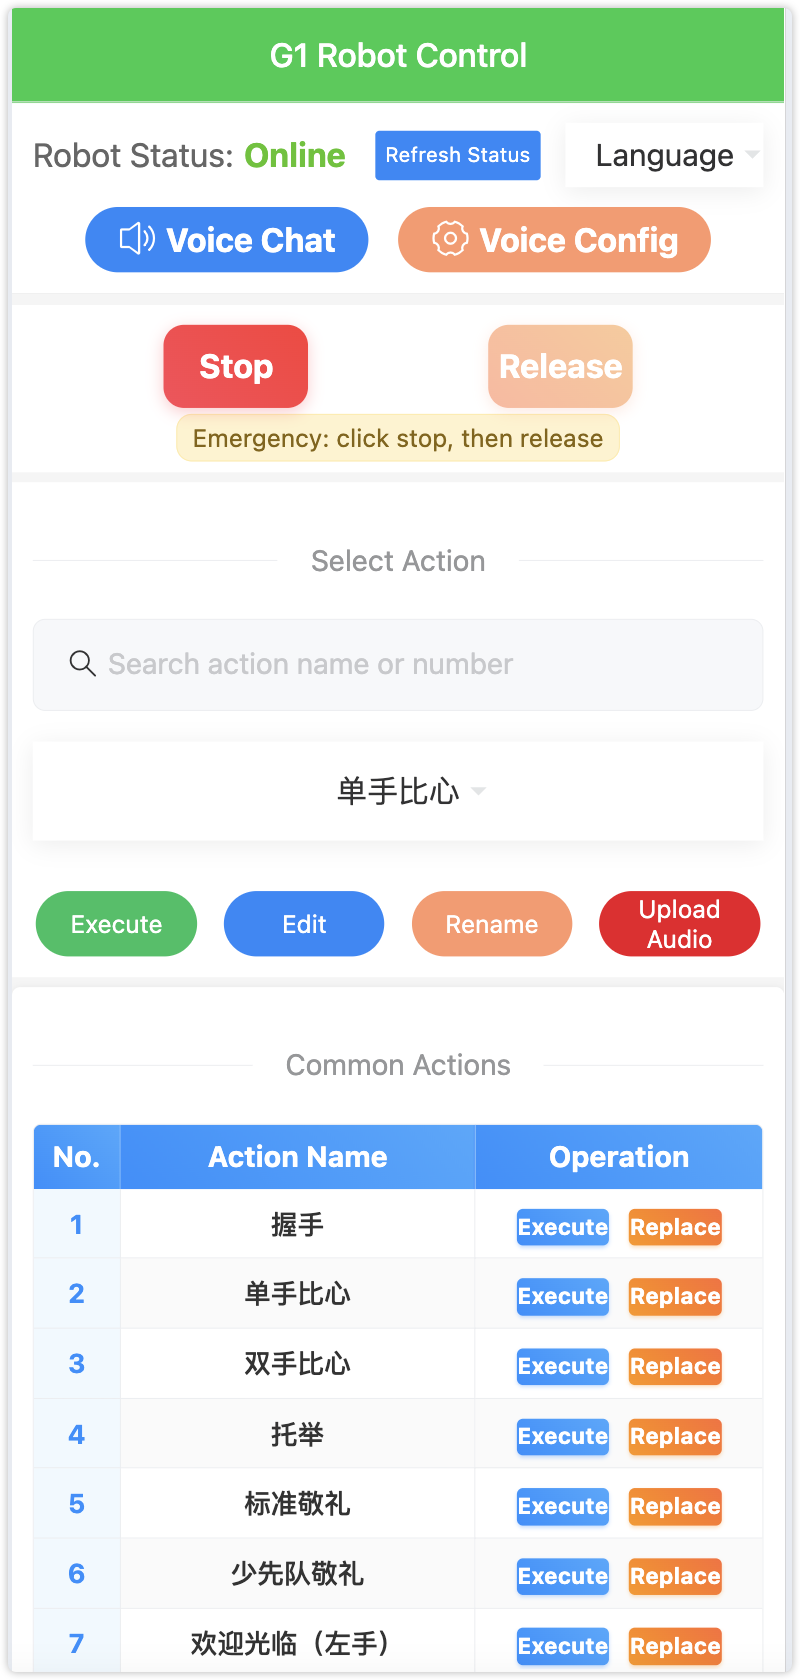
Figure 1-1: G1 Robot Control Main Interface
1.2 Interface Layout
The system interface contains the following areas from top to bottom:
┌─────────────────────────────────────┐
│          G1 Robot Control          │  ← Top Title Bar
├─────────────────────────────────────┤
│     Robot Status: Online/Offline    │  ← Status Display Area
│   [Refresh] [Voice Chat] [Voice Config] │  ← Function Button Area
├─────────────────────────────────────┤
│       [Stop] [Release] - Emergency Control │  ← Emergency Control Area
├─────────────────────────────────────┤
│            Select Action           │  ← Action Selection Area
│         [Search Box] [Action Dropdown] │
├─────────────────────────────────────┤
│ [Execute] [Edit] [Rename] [Upload Audio] │ ← Operation Button Area
├─────────────────────────────────────┤
│           Common Actions Table     │  ← Quick Operation Area
│  No.  |  Action Name  |  [Execute][Replace] │
├─────────────────────────────────────┤
│           Operation Guide Area     │  ← Help Description Area
└─────────────────────────────────────┘
1.3 Basic Control Buttons
| Button Name |
Color |
Function Description |
| Stop |
🔴 Red |
Emergency stop all actions |
| Release |
🟠 Orange |
Release robot joints after stopping |
| Voice Chat |
🔵 Blue |
Enable voice interaction (requires voice configuration) |
| Voice Config |
🟡 Yellow |
Set voice parameters |
⚠️ Important Reminder: In emergency situations, immediately click the red "Stop" button, then click the "Release" button.
Chapter 2: Action Selection and Execution
⚠️ Important Reminder: Before executing actions, confirm that the robot is in motion control mode (press R1+X on controller to enter) and in "natural posture"!
2.1 Select Action
Operation Steps
- Find the dropdown menu in the "Select Action" area
- Click the dropdown menu to display 118 available actions (Action001-Action118)
- Click to select the desired action
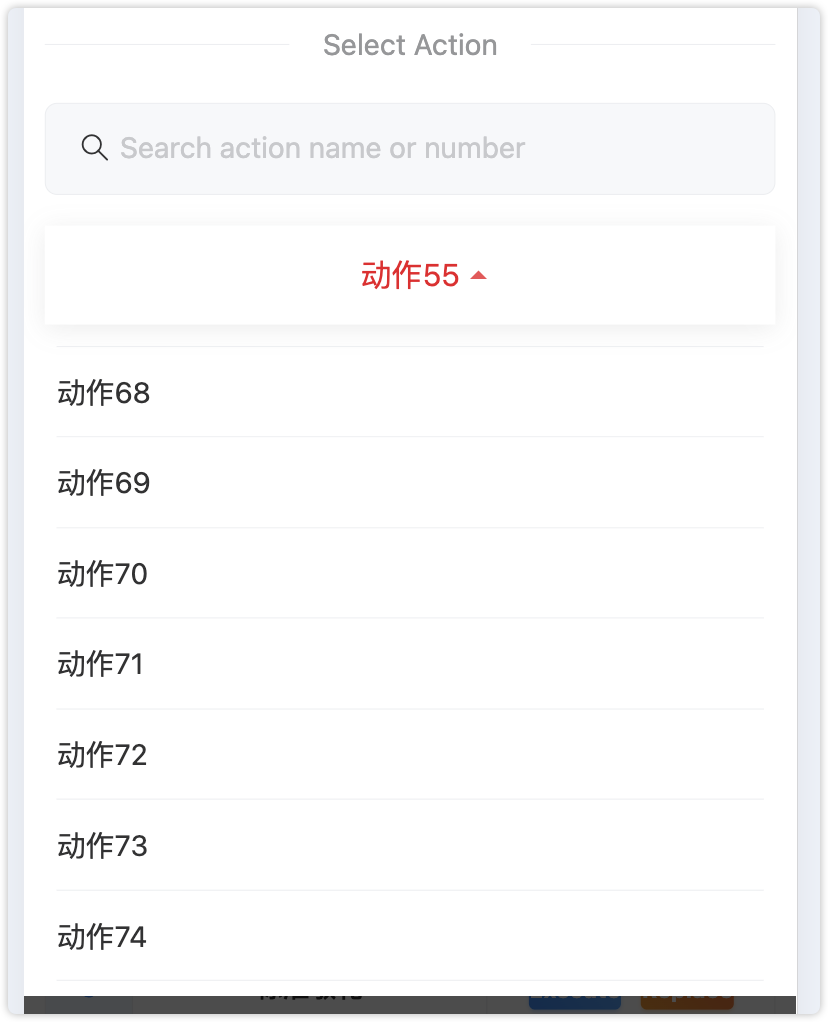
Figure 2-1: Action Selection Dropdown Menu
2.2 Search Actions
The search function supports multiple ways to quickly locate actions:
Search Methods
- Action Name Search: Enter "handshake" to find actions containing that word
- Number Search: Enter "Action001" or "001" for quick positioning
- Fuzzy Matching: Enter "hand" to match "handshake action"
Operation Steps
- Enter keywords in the search box
- System automatically filters matching actions
- Below displays "Found X actions" statistics
- Select desired action from filtered results
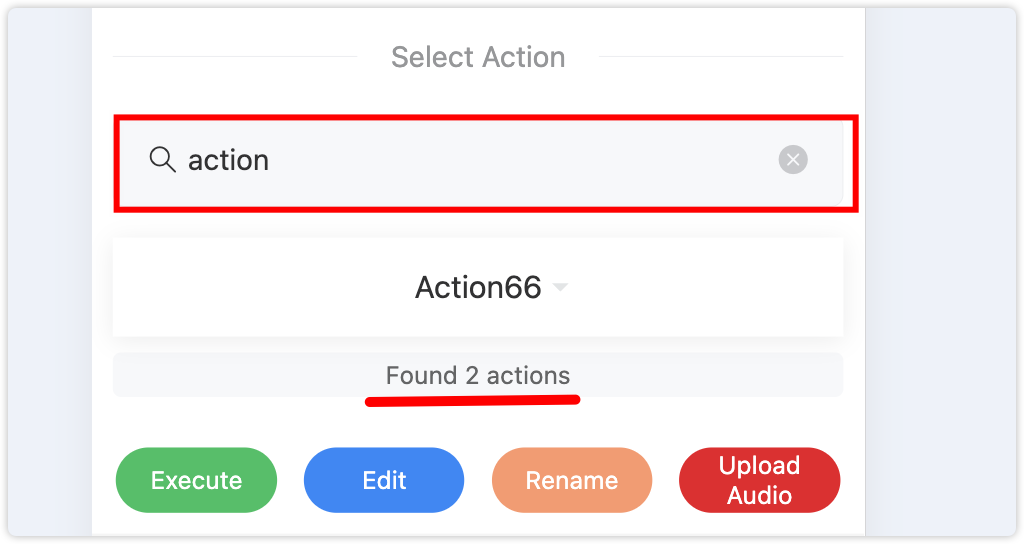
Figure 2-2: Action Search Function Demo
2.3 Execute Action
Operation Steps
- ✅ Ensure robot status shows "Online"
- ✅ Select the action to execute
- ✅ Click "Execute" button
- ✅ Wait for action execution to complete
⚠️ Safety Reminder
- Actions can only be executed when robot is online
- Avoid repeated clicking during execution
- Ensure safe environment around the robot
- Robot must be in motion control mode and in natural posture
2.4 Modify Action Name
Operation Process
- Select the action to modify
- Click "Rename" button
- Enter new name in popup window (max 20 characters)
- Click "Confirm" to save
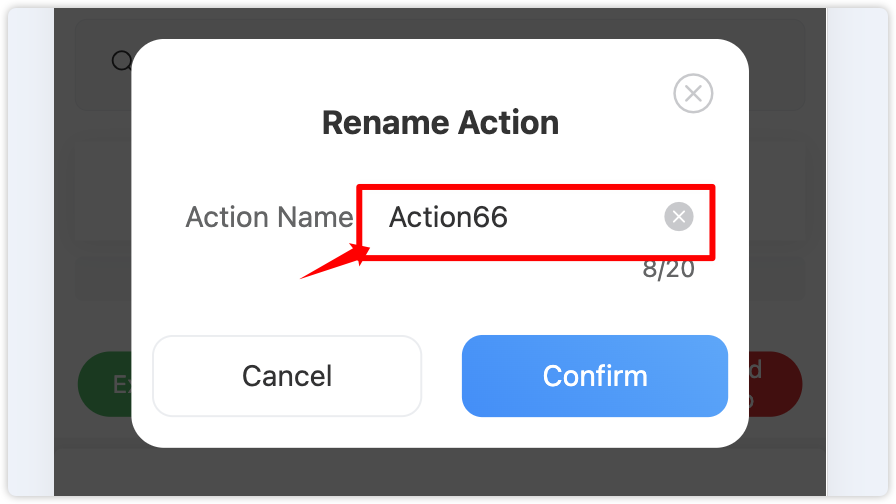
Figure 2-3: Modify Action Name Popup
Naming Suggestions
- Use descriptive names like "Handshake Greeting", "Dance Performance"
- Avoid special characters
- Recommend using descriptive language
2.5 Common Actions Quick Operations
The common actions area provides 10 quick action positions for fast execution of frequently used actions, and also supports dynamic replacement of action content, greatly improving operation efficiency.
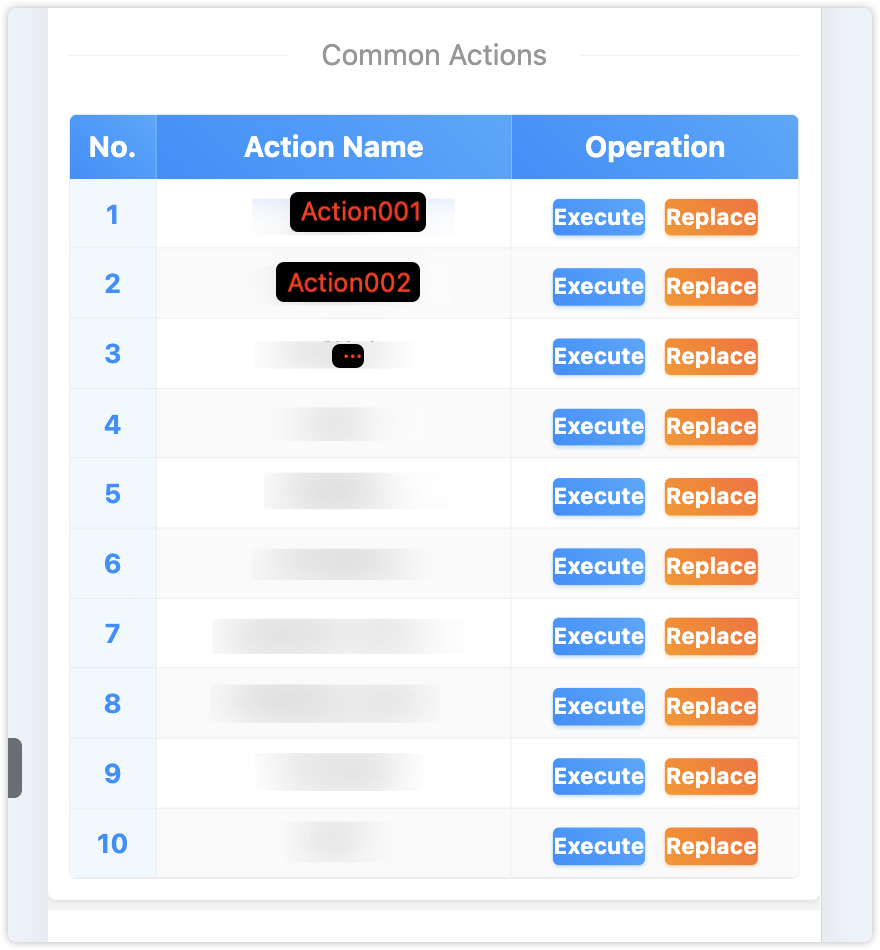
Figure 2-4: Common Actions Quick Operation Area
Feature Highlights
- Quick Execution: No dropdown selection needed, direct click to execute
- Dynamic Replacement: Can change common action content anytime
- Number Display: Clear 1-10 numbering for easy identification
- Status Indication: Loading status display during execution
Execute Common Actions
Operation Steps:
- Ensure robot status shows "Online"
- Find the action to execute in the common actions table
- Click the Execute button in the corresponding row
- Wait for action execution to complete
Replace Common Actions
Operation Process:
- Step 1: Select Replacement Position
- Click the Replace button in the action row to be replaced
- System pops up "Select Replacement Action" window
- Step 2: Select New Action
- Browse all available actions in the popup (e.g., Action11-Action118)
- Click to select the action to replace
- Click "Confirm Replace" button
- Step 3: Confirm Replacement
- System displays replacement details confirmation window
- Check action information before and after replacement
- Click "Confirm Replace" to complete operation
⚠️ Replacement Note: Replacement operation will swap the positions of two actions, the original common action will move to another position, but won't be lost.
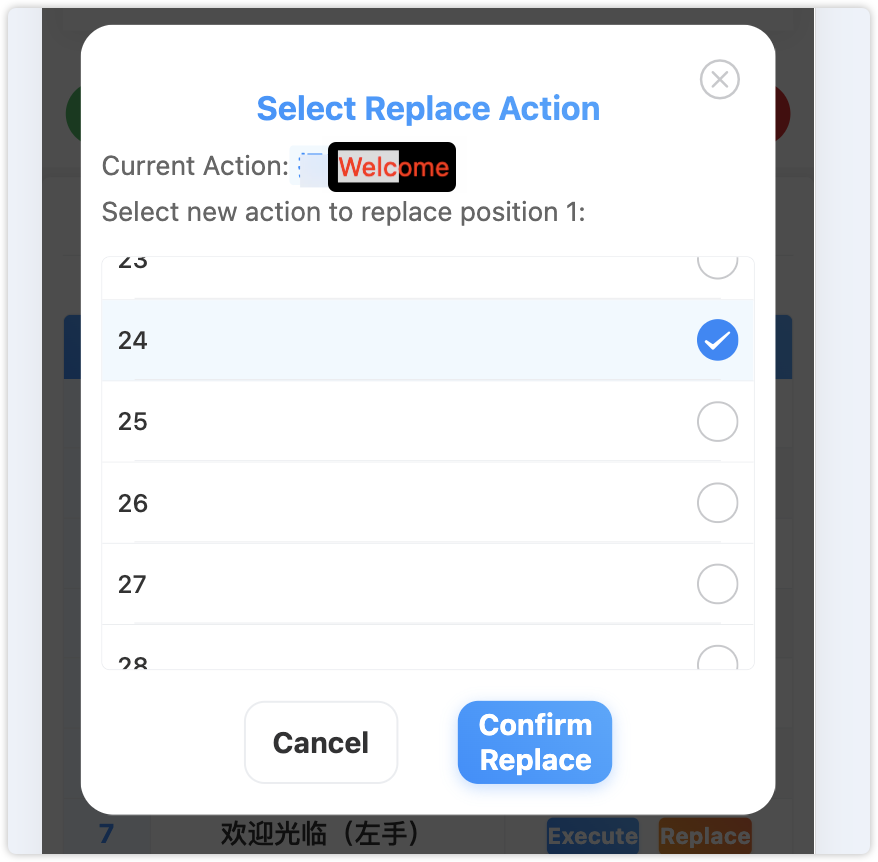
Figure 2-5: Replace Action Selection Window
2.6 Upload Audio Files
Supported Formats
- File Types: MP3, WAV and other common audio formats
- File Size: Maximum 30MB
- Purpose: Add voice prompts or background music to actions
Operation Steps
- Select the corresponding action
- Click "Upload Audio" button
- Select audio file
- Wait for upload to complete
Chapter 3: Action Editing Features
⚠️ Important Reminder: All editing operations (manual addition, copy, delete, modify) must click the "Confirm Changes" button to take effect!
3.1 Enter Edit Mode
Operation Steps
- Select the action to edit
- Click "Edit" button
- Wait for system to load action data
- Edit window pops up
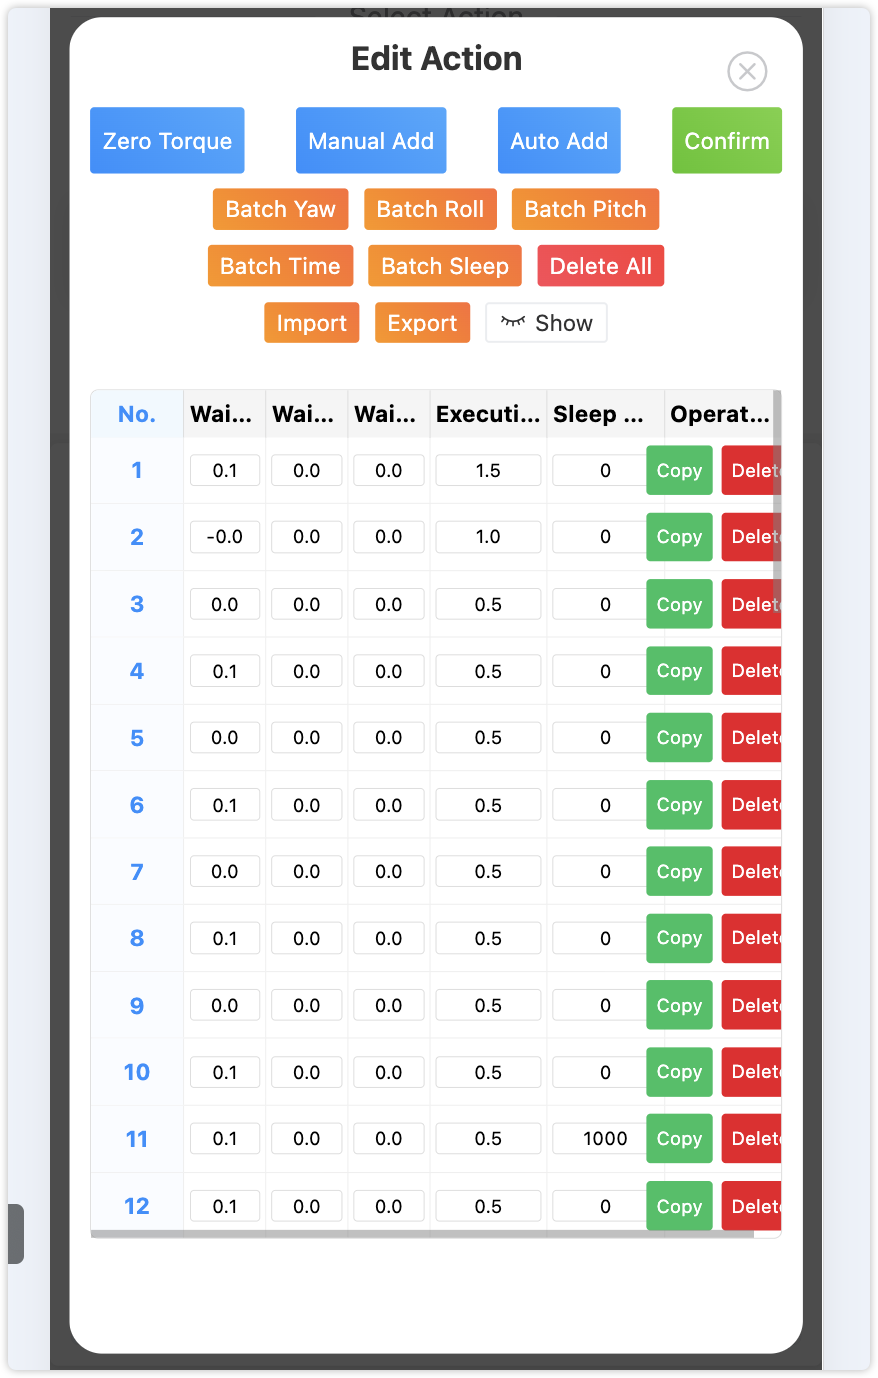
Figure 3-1: Action Edit Interface Overview
3.2 Edit Interface Overview
The edit window contains the following main areas:
Function Button Area
- Zero Torque: Let robot arms enter powerless state, supports simultaneous waist relaxation
- Manual Add: Manually get robot's current position to add action rows
- Auto Add: Automatically continuously get robot action data (up to 10 minutes)
- Confirm: Save edit results
- Import: Import action data
- Export: Export action data
- Show/Hide: Toggle display mode
Batch Operation Area
- Batch Yaw/Roll/Pitch: Batch adjust waist joints
- Batch Time: Uniformly adjust action speed
- Batch Sleep: Uniformly adjust action intervals
- Delete All: Clear all action data

Figure 3-2: Edit Function Button Area
3.3 Display Mode Toggle
Two Display Modes
| Mode |
Display Content |
Target Users |
| Simple Mode |
Waist joints, execution time, sleep time |
Recommended for beginners |
| Detailed Mode |
All 19 parameters |
Suitable for advanced users |
- Click "Show"/"Hide" button to toggle
- Simple mode helps focus on core parameters
- Detailed mode provides complete control capability
3.4 Edit Joint Angles
Parameter Range Description
| Joint Type |
Angle Range |
Precision |
Description |
| Arm Joints |
According to arm joint rotation angles |
0.1 |
14 arm joints, actual rotation angle: parameter value × 57.3°, e.g., input 0.1, rotation angle is 5.73° |
| Waist Yaw |
-1.0 ~ 1.0 |
0.1 |
Body left-right turning, actual rotation angle: parameter value × 57.3°, e.g., input 0.1, rotation angle is 5.73° |
| Waist Roll |
-0.3 ~ 0.3 |
0.1 |
Body left-right tilt, actual rotation angle: parameter value × 57.3°, e.g., input 0.1, rotation angle is 5.73° |
| Waist Pitch |
-0.3 ~ 0.3 |
0.1 |
Body forward-backward tilt, actual rotation angle: parameter value × 57.3°, e.g., input 0.1, rotation angle is 5.73° |
| Execution Time |
≥0.1 seconds |
0.1 seconds |
Action execution duration, defined by action execution angle or amplitude. Smaller values = faster speed, larger values = slower speed |
| Sleep Time |
≥0 milliseconds |
1 millisecond |
Pause time between actions, usually 1000ms (equals 1 second), if set to 0, no pause between actions, uniform execution |
⚠️ Safety Warning: If data is added through auto action addition, it's not recommended to modify parameters! Otherwise it may damage the machine!
Editing Method
- Click the value box to modify
- Enter new value
- System automatically validates range
- Out of range values automatically adjusted to boundary values
- Auto-format when losing focus
- Note: Rotation angle = parameter value × radians, e.g., input 0.1, radians = 5.73°, input value 1.0, rotation angle = 57.3°
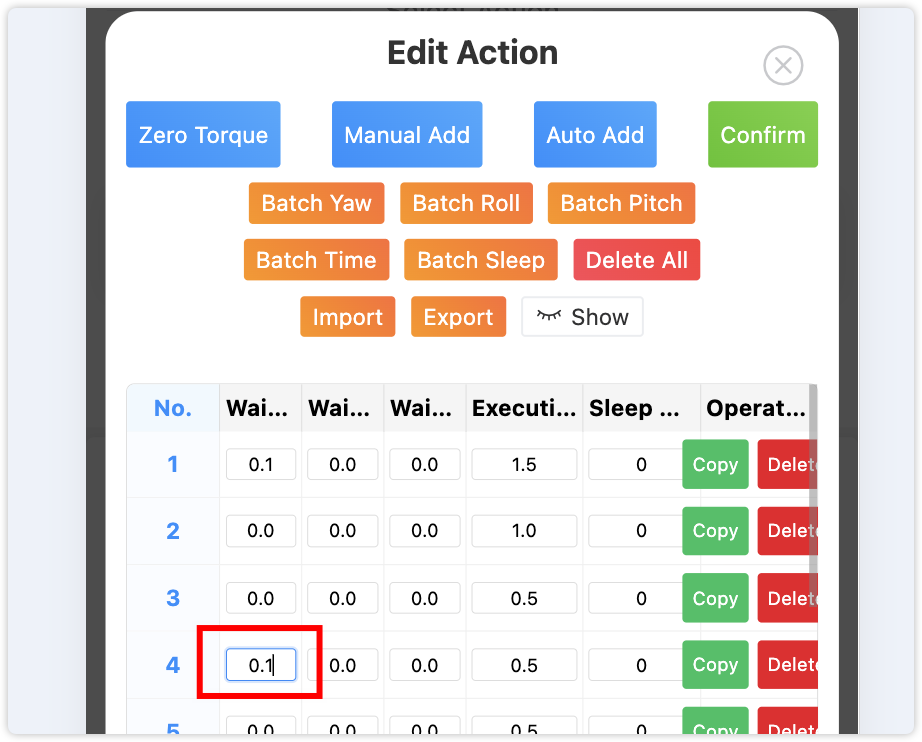
Figure 3-3: Parameter Edit Operation Demo
3.5 Arm Zero Torque Function
The arm zero torque function supports choosing arm-only zero torque or simultaneous waist zero torque, providing more flexibility for action design.
Operation Steps
- Ensure robot is in standing position and online
- Click Zero Torque button
- System pops up zero torque mode selection window
- Choose appropriate zero torque mode:
- Arm Only Zero Torque: Only let arms enter powerless state, waist remains normal
- Simultaneous Waist Relaxation: Both arms and waist enter zero torque state, waist can also rotate and tilt, but waist loses support force, requires human assistance for safety.
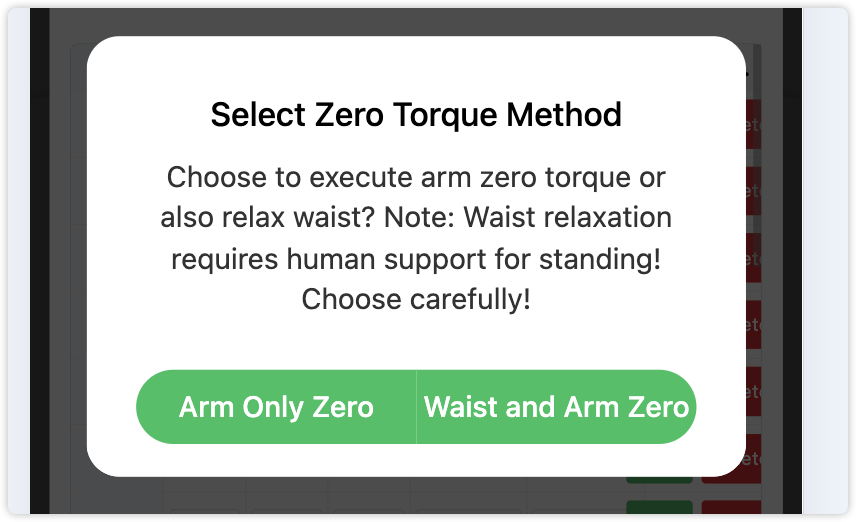
Figure 3-4: Arm Zero Torque Mode Selection Window
Two Mode Comparison
| Mode |
Arm Status |
Waist Status |
Application Scenarios |
Safety Requirements |
| Arm Only Zero Torque |
Powerless State |
Normal Control |
Arm Action Design |
Robot Can Stand Independently |
| Simultaneous Waist Relaxation |
Powerless State |
Powerless State |
Arm + Waist Action Design |
Requires Human Support |
⚠️ Safety Warning: When choosing "Simultaneous Waist Relaxation", the waist loses support force, the robot may fall, human assistance is required for safety!
⚠️ Recovery Instructions: Click stop button, then click release button, robot can return to normal state.
3.6 Manual Action Addition
📝 Function Description
Manual action addition can get the robot's current joint positions to create new action sequences. By adjusting robot posture and recording positions, various complex action combinations can be designed.
Detailed Operation Steps
Step 1: Adjust Robot Posture
Recommended Method (Software Control):
- Ensure robot is in standing position
- Click Zero Torque button
- Choose appropriate zero torque mode
- Robot joints enter powerless state
- Manually easily pose various required action postures
Alternative Method (Hardware Control):
- Directly suspend robot (avoid falling)
- Enter zero torque mode via remote control
- Manually adjust robot to desired posture
Step 2: Record Current Position
- After posing the action posture, click Manual Add button
- System gets current robot's all joint positions
- Verify data validity:
- Arm joint angle parameters: Adjust according to arm joint rotation angle range, ensure safety
- Actual rotation angle calculation: Parameter value × 57.3°
- Example: Parameter value 0.1 = 5.73°, parameter value 1.0 = 57.3°
- New row automatically added to table end
Step 3: Save Changes
- After completing action addition, click Confirm button
- System saves newly added action data
3.7 Auto Action Addition
🚀 Major Feature
Auto action addition is a brand new advanced feature that can continuously automatically acquire robot action data, about 600 action frames per minute, supporting up to 10 minutes of continuous recording, greatly improving the efficiency of complex action creation.
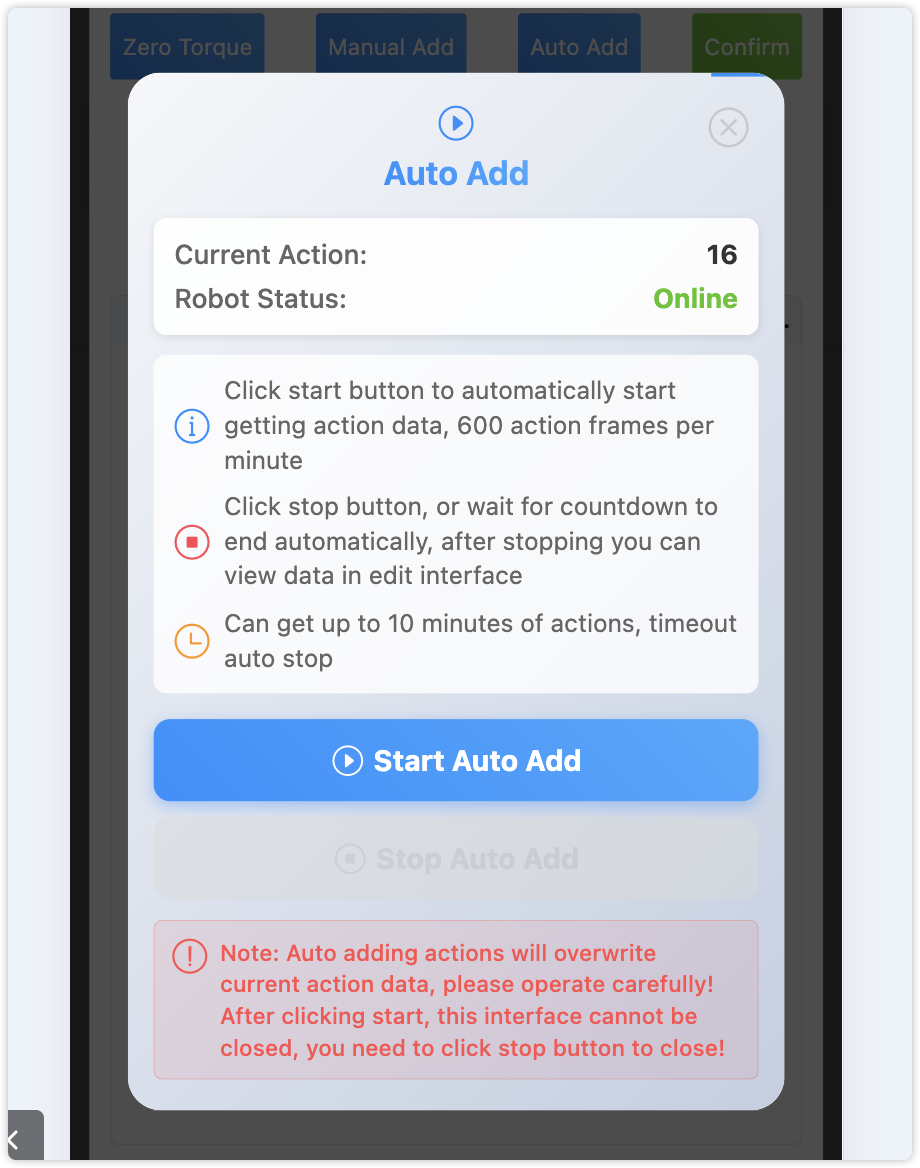
Figure 3-5: Auto Add Action Function Popup
Feature Highlights
- Continuous Recording: About 600 action frames per minute, finely capturing action details
- Long Duration Support: Up to 10 minutes continuous recording, supporting complex action sequences
- Real-time Countdown: Clearly displays remaining recording time
- Safety Protection: Popup cannot be closed during recording, preventing misoperation
- Auto Stop: Automatically stops after timeout
Detailed Operation Process
Step 1: Preparation
- Ensure robot status is "Online"
- Select the action file to edit
- Click "Edit Action" to enter edit interface
- Click Auto Add button
- System pops up confirmation dialog, click "Confirm" to clear current data
Step 2: Start Recording
- Auto add popup appears, showing current action and robot status
- After confirming all information is correct, click Start Auto Add button
- System starts 10-minute countdown
- Start executing robot actions, system automatically records:
- About 10 action frames per second (1 minute ≈ 600 frames)
- Records all joint positions and angles
- Real-time display of progress bar and remaining time
Step 3: Stop Recording
Auto Stop:
- Automatically stops when 10-minute countdown ends
- Displays "10 minutes time up, auto add stopped" prompt
Manual Stop:
- Click Stop Auto Add button
- System immediately stops recording
Step 4: View Results
- After recording ends, close popup
- Enter edit interface
- View recorded action data:
- Each row represents one action frame
- Contains complete 19 parameters
- Can view parameters, but not recommended to modify parameters
Recording Interface Details
| Interface Element |
Function Description |
Status Indication |
| Current Action Display |
Shows the name of action being recorded |
Real-time update of selected action |
| Robot Status |
Shows connection status |
Online (Green) / Offline (Red) |
| Countdown Display |
Shows remaining recording time |
MM:SS format, real-time update |
| Progress Bar |
Shows recording progress |
0-100%, color gradient |
| Operation Buttons |
Start/Stop recording |
Dynamic switching, status indication |
Application Scenarios and Suggestions
Applicable Scenarios:
- 🕺 Dance Actions: Record complete dance sequences
- 🤝 Continuous Gestures: Complex gesture combination actions
- 🎭 Performance Actions: Dramatic continuous performances
- 🏃 Sports Actions: Gymnastics, martial arts and other sports sequences
Operation Suggestions:
- Practice actions before recording to ensure smoothness
- Control action amplitude, avoid excessive joint angles
- Maintain stable action rhythm
- Ensure safe recording environment, avoid interference
⚠️ Important Reminder:
- After clicking auto add, it will automatically overwrite current action data, please operate carefully
- Popup cannot be closed during recording, must stop before closing
- Recommend backing up important action data before recording
- Data automatically saved after recording ends
- All parameters from auto add are not recommended to modify to prevent damaging the robot
⚠️ Important Reminder: All editing operations (manual addition, copy, delete, modify) must click the "Confirm Changes" button to take effect!
💡 Professional Suggestions:
- Recommend operating in a safe environment, avoid robot falling
- When adjusting posture, movements should be gentle to avoid damaging joints
- Can design several basic postures first, then combine into complex actions
- Before recording actions, confirm posture meets expected effect
- Note: Movement angle between two actions should not be too large, try to keep within 90 degrees, if exceeding 90, execution time recommended to modify to 2.0
3.8 Copy Action Rows
Operation Steps
- Click the Copy button in the target row
- Choose copy position in the popup dialog:
- Add to End: Append to the end of the table
- Copy to Next Row Below: Insert to current row + 2 position, e.g., ABCD four rows, click row A to copy, then insert to row C position, becomes ABACD
- After copying is complete, click Confirm button to save
Usage Scenarios
- Create repeated action sequences
- Create variants based on existing actions
- Quickly build complex action combinations
💡 Tips: Copy operations can greatly improve action programming efficiency, especially suitable for creating periodic actions
3.9 Delete Action Rows
Operation Steps
- Click the Delete button in the target row
- Select "Delete" in the confirmation dialog
- Row is removed from the table
- After completing deletion, click Confirm button to save
⚠️ Delete Warning:
- Delete operation cannot be recovered, please operate carefully
- Recommend exporting data for backup before deleting
- Must click "Confirm Changes" after deletion to take effect
3.10 Save Changes
⚠️ Key Reminder: All editing operations in Chapter 3 (add, copy, delete, modify parameters) must click the Confirm Changes button to take effect!
Unified Save Process
- After completing any editing operation, click Confirm button
- System validates data integrity (check parameter ranges)
- Save data to server
- Display "Action data saved successfully" prompt
- Edit window closes, return to main interface
Save Considerations
- Must Save: All editing operations need to be saved to take effect
- Data Validation: System checks parameter validity before saving
- Backup Recommendation: Important actions recommend exporting backup first
- Network Requirement: Saving requires robot online status
✅ Save Success Indicators:
- "Action data saved successfully" prompt appears
- Edit window automatically closes
- Return to main interface, changes have taken effect
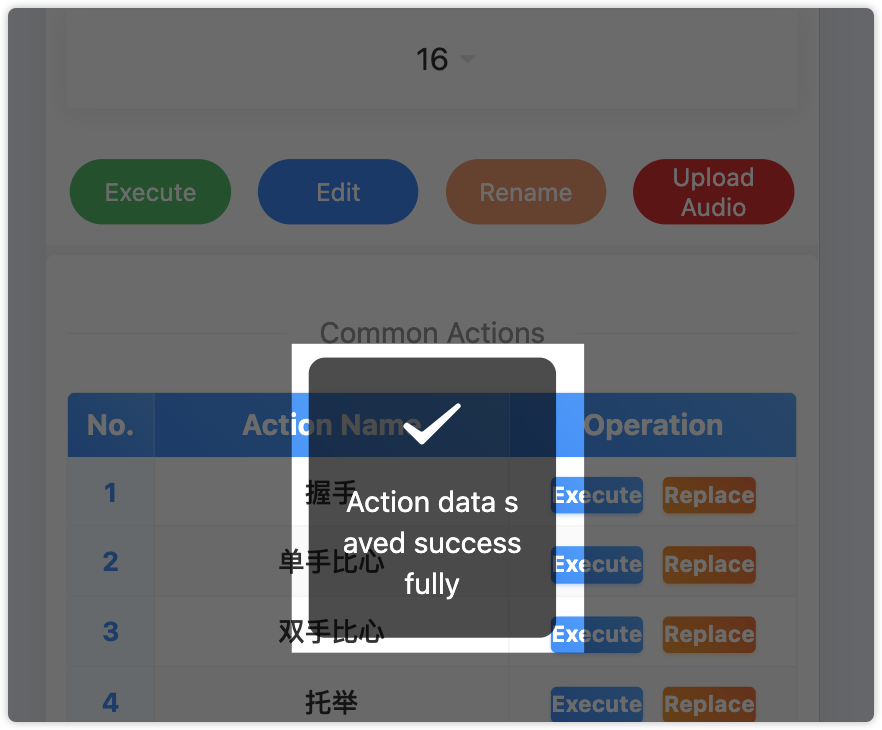
Figure 3-6: Save Success Prompt
Chapter 4: Data Management
4.1 Batch Operations
Batch Modify Execution Time
Operation Steps:
- Click "Batch Time"
- Enter time value (e.g., 2.0)
- Click "Confirm" to apply to all rows
Usage Scenarios:
- Overall speed up or slow down action speed
- Unify action rhythm
- Batch adjust action smoothness
Batch Modify Sleep Time
Operation Steps:
- Click "Batch Sleep"
- Enter millisecond value (e.g., 1000)
- Click "Confirm" to apply to all rows
Practical Applications:
| Sleep Time |
Effect |
Application Scenarios |
| 0 milliseconds |
Continuous actions, no pause |
Smooth continuous actions |
| 500 milliseconds |
Brief pause |
Rhythmic actions |
| 1000 milliseconds |
Standard interval |
General performance actions |
| 2000 milliseconds |
Obvious pause |
Emphasize key actions |
Batch Modify Waist Joints
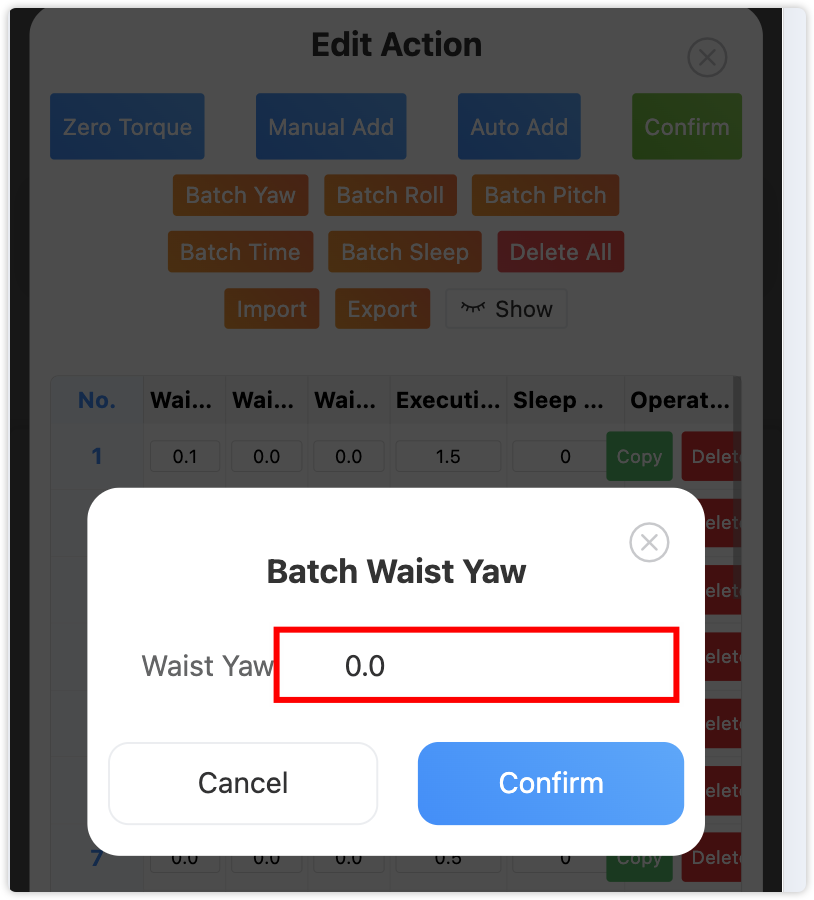
Figure 4-1: Batch Modify Waist Joints Popup
| Joint Type |
Range |
Purpose |
Common Values |
| Waist Yaw |
-1.0 to 1.0 |
Adjust body orientation |
0.0 (forward), ±0.3 (slight turn) |
| Waist Roll |
-0.3 to 0.3 |
Adjust body tilt |
Usually keep 0.0 |
| Waist Pitch |
-0.3 to 0.3 |
Adjust forward/backward tilt |
Bow (0.2), chest out (-0.1) |
Batch Delete Operations
Safe Delete Process:
- Click "Delete All" button
- System displays warning confirmation box
- Confirm "This operation cannot be undone" prompt
- Click "Confirm Delete" to clear all data
⚠️ Important Reminder: Batch delete operations cannot be undone, please use carefully!
4.2 Data Import/Export
Import Data
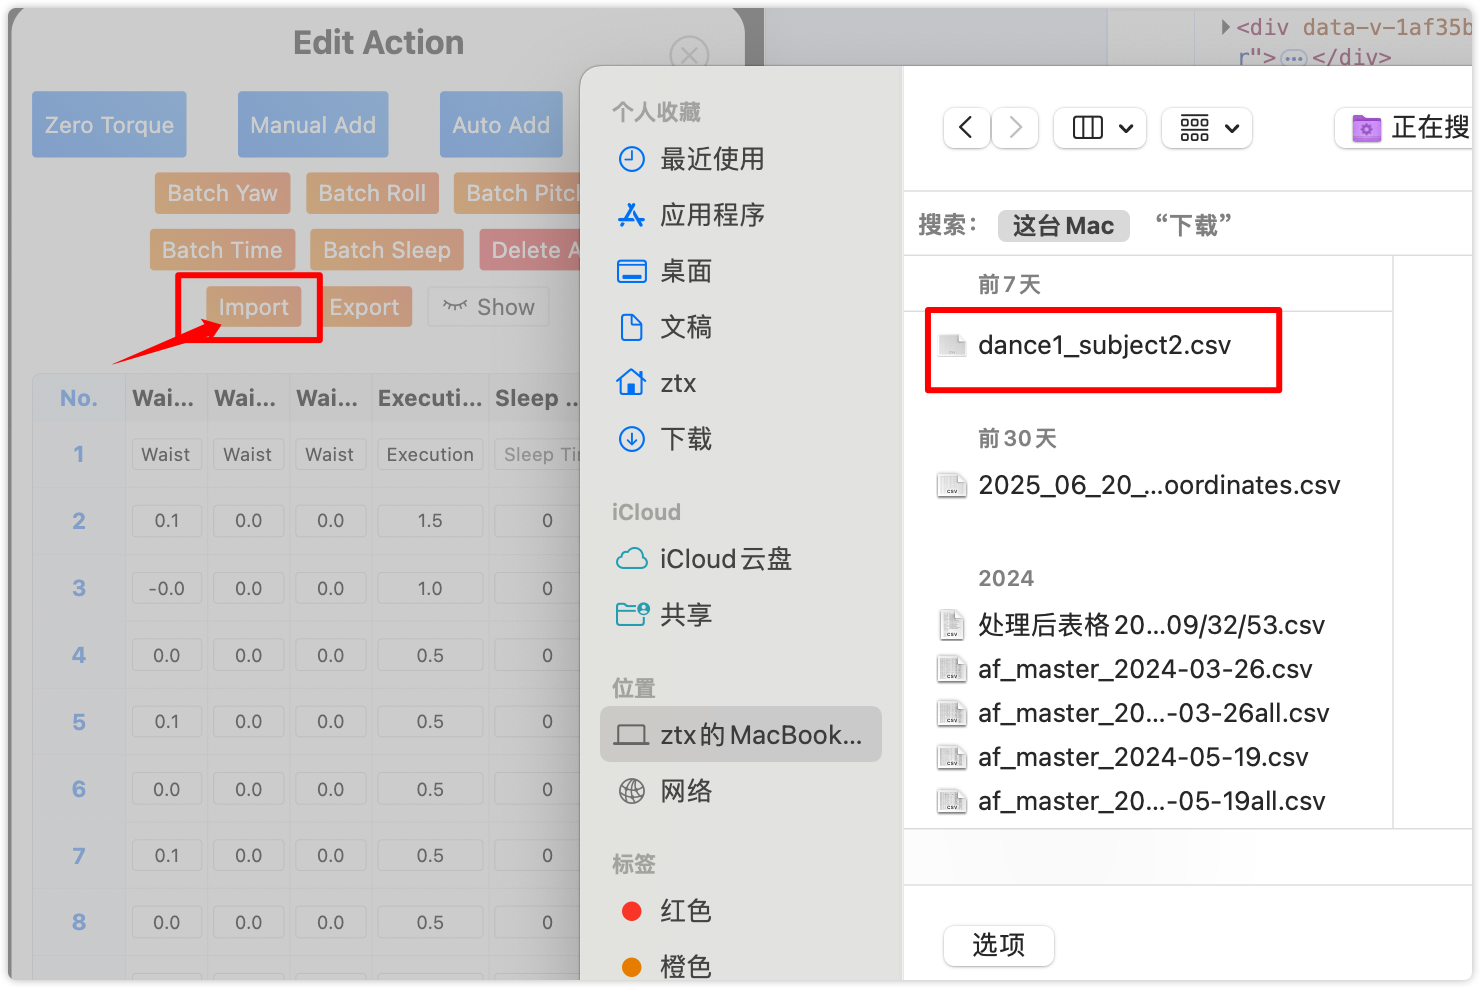
Figure 4-2: Data Import Operation Interface
Operation Steps:
- Click "Import" button
- Select CSV format file
- System automatically parses and replaces current data
- Display import success prompt
Export Data
Operation Steps:
- Click "Export" button
- System generates CSV file
- File name format:
{action_name}_data.csv
- Automatically download to local
File Format Requirements
Basic Requirements:
- File Type: CSV format
- Encoding: UTF-8
- Columns: 19 columns of data
CSV File Format Example:
Left Shoulder Pitch,Left Shoulder Roll,Left Shoulder Yaw,Left Elbow,Left Wrist Roll,Left Wrist Pitch,Left Wrist Yaw,Right Shoulder Pitch,Right Shoulder Roll,Right Shoulder Yaw,Right Elbow,Right Wrist Roll,Right Wrist Pitch,Right Wrist Yaw,Waist Yaw,Waist Roll,Waist Pitch,Execution Time,Sleep Time
0.0,0.0,0.0,0.0,0.0,0.0,0.0,0.0,0.0,0.0,0.0,0.0,0.0,0.0,0.0,0.0,0.0,2.0,1000
0.5,0.2,0.3,1.0,0.0,0.0,0.0,-0.5,-0.2,-0.3,-1.0,0.0,0.0,0.0,0.2,0.0,0.1,1.5,500
Export Purposes
- 📁 Backup Data: Save action design results
- 🔄 Data Sharing: Exchange actions with other developers
- 📋 Version Management: Maintain different versions of actions
- 📊 Batch Editing: Process data in tools like Excel
Chapter 5: Voice Configuration
5.1 Open Voice Configuration
Operation Steps
- Ensure robot is online
- Click "Voice Config" button
- System loads current configuration
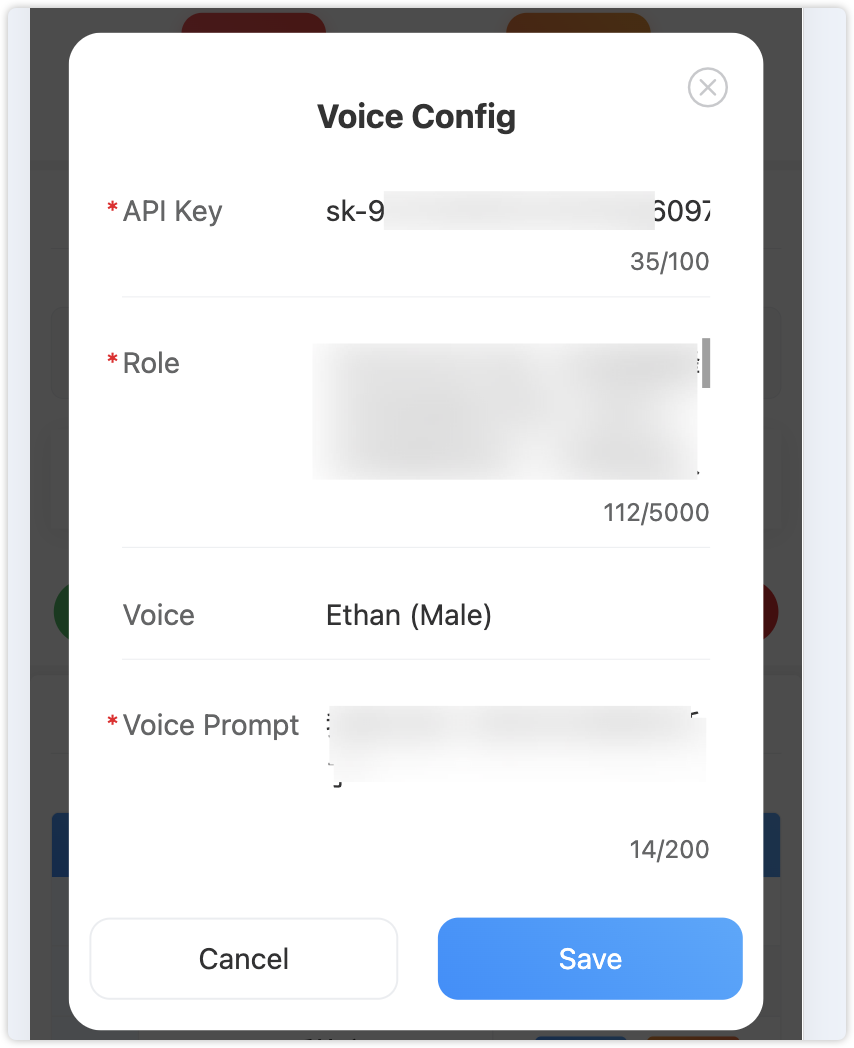
Figure 5-1: Voice Configuration Interface
5.2 Configuration Parameters
API Key Configuration
- Purpose: Voice service authentication key
- Requirement: Valid API key
- Length Limit: Maximum 100 characters
- Obtain Method: Contact technical support
⚠️ Important Reminder: Do not modify API Key arbitrarily, otherwise voice service will not work properly
Role Definition
Voice Type Selection
| Voice Type |
Gender |
Characteristic Description |
Application Scenarios |
| Cherry |
Female |
Gentle and Sweet |
Home Environment, Children Interaction |
| Serena |
Female |
Professional and Mature |
Business Occasions, Formal Demonstrations |
| Chelsie |
Female |
Lively and Young |
Entertainment Performances, Active Occasions |
| Ethan |
Male |
Steady and Reliable |
Serious Occasions, Authority Display |
Enable Voice Prompts
- Purpose: Robot's greeting when starting up
- Length Limit: Maximum 200 characters
- Examples:
- "Hello, I am G1 robot, ready to serve you"
- "Welcome to G1 robot system, please tell me what you need me to do"
- "I am Xiaoxin, Yaomei's boyfriend, now you can talk to me."
5.3 Save Configuration
Save Process
- Fill in all required fields
- Click "Save" button
- Wait for save completion prompt
Configuration Validation
System will automatically validate:
- ✅ API Key format correctness
- ✅ Field length limits
- ✅ Required field completeness
Chapter 6: Common Issues
6.1 Connection Issues
Problem: Robot Shows Offline Status

Figure 6-1: Robot Offline Status Display
Solutions:
- Check Network Connection
- Confirm Wi-Fi connection is normal
- Confirm phone and robot are connected to the same Wi-Fi
- Test network latency and stability
- Check firewall settings
- Restart Service
- Click "Refresh Status" button
- Wait for system to reconnect
- Observe status changes
- Check Robot Status
- Confirm robot power is on
- Check robot network configuration
- Verify IP address settings
6.2 Action Execution Issues
Problem: Action Execution Fails or Abnormal
Diagnostic Steps:
- Check Parameter Validity
- Verify joint angle ranges (according to key angle ranges)
- Confirm execution time settings (≥0.1 seconds)
- Check sleep time settings (≥0 milliseconds)
- Analyze Error Information
- Check browser console error logs
- Check API return status
- Record error occurrence time
- Step-by-step Testing
- Test each action individually
- Verify action sequence completeness
- Try simplifying action parameters
6.3 Editing Issues
Problem: Cannot Modify Values
Solutions:
- Confirm input values are within valid range
- Arm joints: Actual parameters should be adjusted according to robot arm rotation range
- Waist yaw: -1.0 to 1.0
- Waist roll/pitch: -0.3 to 0.3
- Check Network Connection Status
- Confirm robot is online
- Test network stability
- Refresh Page and Retry
- Save current work
- Refresh browser page
- Re-enter edit mode
6.4 File Operation Issues
Problem: Import/Export Fails
Check Items:
- File Format Validation
- Confirm CSV format is correct
- Check file encoding is UTF-8
- Verify data completeness (19 columns)
- Permission Check
- Confirm file access permissions
- Check sufficient storage space
- Verify file is not occupied
- Data Validation
- Confirm value ranges are correct
- Check required fields are complete
- Verify data format consistency
Appendix: Quick Operation Process
Quick Start for Beginners
Basic Operation Process
Basic Operation Flow Chart
Start System → Check Robot Status → Status Online? → [No]Click Refresh Status → [Yes]Select Action → Execute Action → Observe Execution Result
Operation Steps:
- Execute Action → Confirm Robot Online → Select Action → Execute Action
- Quick Execute → Common Actions Area → Click Execute
- Replace Common Action → Click Replace → Select New Action → Confirm Replace
- Modify Action Name → Select Action → Modify Name → Save
- Manual Edit → Select Action → Edit → Manually Add/Copy/Delete Action Rows → Modify Parameters → Save
- Auto Record → Select Action → Edit → Auto Add → Start Recording → Stop Recording → Save
Recommended Parameters
Execution Time Recommendations
| Action Type |
Recommended Time |
Application Scenarios |
| Fast Actions |
0.1-1.0 seconds |
Dance movements, small amplitude actions |
| Standard Actions |
1.5-2.5 seconds |
Waving, handshake, simple gestures |
| Slow Actions |
3.0-5.0 seconds |
Precise positioning, demonstration actions |
Sleep Time Recommendations
| Time Interval |
Effect |
Application Scenarios |
| 0-300 milliseconds |
Continuous actions |
Smooth action sequences, small amplitude continuous actions recommended as 0 |
| 500-1000 milliseconds |
Pause effect |
Rhythmic performances |
| 1500-3000 milliseconds |
Obvious intervals |
Emphasize key actions |
Safety Operation Checklist
Pre-operation Check
- ✅ Ensure safe environment around the robot
- ✅ Check robot connection status is normal
- ✅ Verify action parameters are within safe range
- ✅ Know the location of emergency stop button
Operation Precautions
- ✅ Monitor robot execution status
- ✅ Avoid joint angles approaching limit values
- ✅ Click stop button immediately in emergency situations
- ✅ Test complex actions before execution
Post-operation Maintenance
- ✅ Regularly backup important action data
- ✅ Clean up temporary and test data
- ✅ Update action library documentation
- ✅ Summarize operation experience and issues
Technical Support
Issue Feedback Information
If you encounter technical issues, please collect the following information to contact technical support:
- 📋 Error Message: Complete error message content
- 📝 Operation Steps Details: Specific operations before the issue occurred
- 🤖 Robot Status Information: Online/offline status and connection information
- 🌐 Browser Information: Browser type and version number
- ⏰ Issue Occurrence Time: Specific time point
- 📸 Interface Screenshot: Interface state when the issue occurred
Contact Information
- 📧 Technical Email: 659854670@qq.com
- 📞 Technical Hotline: 13548113202
Conclusion
This operation guide covers the core functions and latest features of the G1 robot system. By following this guide, you can:
- 🎯 Quick Start: Master basic system operations and interface usage
- ⚡ Efficient Operation: Use common actions area to quickly execute and manage actions
- 🎨 Create Actions: Design complex action sequences through manual addition and auto recording
- 🤖 Precise Control: Master advanced functions of arm zero torque and waist control
- 📊 Data Management: Efficiently process and maintain action data
- 🔧 Problem Solving: Independently handle common technical issues
Learning Recommendations
- Beginners: Start with basic operations and common actions area, familiarize with interface and quick operations
- Intermediate Users: Focus on learning manual action addition, editing functions and batch operations
- Advanced Users: Master auto recording functions and advanced zero torque control, can directly refer to relevant chapters
- Professional Users: Deeply learn the 10-minute recording function of auto add actions, create complex action sequences
⚠️ Important Reminder: Robot operation safety is the first priority, please always test and operate in a safe environment.
Version Information
Document Version: v2.0 | Update Date: January 2025 | Applicable System: Yushu G1 Robot Control System | Document Format: HTML
v2.0 New Features: Common actions quick operations, arm zero torque upgrade, manual/auto add actions, 10-minute auto recording
Enjoy using it! 🎉